Version control
Changes (Ctrl+4) and History (Ctrl+5) cover the Git work of every day — commit, branch, push, merge, rebase, reset, stash, and resolve conflicts — without leaving the window.
Changes
Section titled “Changes”The Changes view lists staged and unstaged files. Select a file to see its diff; switch between side-by-side and inline with the button in the corner.
- Stage or unstage files one by one or all at once, or parts of a file (see below).
- Discard reverts a file to its staged version; untracked files are deleted, with the folders that are empty afterwards. Genbeya asks first.
- Write a message and press
Ctrl+Enter. With nothing staged, the button commits all changes. - Amend last commit puts the last commit’s changes back into the staged list (see Amending).
- Right-click a file for more: stage, discard, open it, add it to .gitignore or stop tracking it.
Fetch, pull (fast-forward only) and push sit above the file list, together with how far the branch is ahead of or behind its upstream. A branch without upstream shows Publish branch instead of push (see Pushing). The ⋯ menu next to them has Push to… and Undo last commit, which takes the last commit off the branch and keeps its changes staged; Redo in the message afterwards puts it back.
Staging hunks and lines
Section titled “Staging hunks and lines”Commit only part of what you changed in a file. The diff of an unstaged file has a bar above every change with Stage hunk and Discard hunk; the diff of a staged file has Unstage hunk. Both the side-by-side and the inline diff have them.
To act on single lines, select them: click a line number, Shift+click another to select the lines between, or move with Shift+↑ / Shift+↓ inside the diff. The bar above the diff then offers Stage selected lines, Discard selected lines or Unstage selected lines. Side by side, select removed lines on the left and added lines on the right; a removed line goes along once you select all the lines that replace it, which is how the inline diff, where removed lines have no numbers, stages a changed line. Lines that did not change are left alone.
- Staging part of an untracked file adds the file with just those lines.
- Discarding asks first and cannot be undone.
- Binary files, and files Git does not compare line by line, are staged as a whole.
- When the file changed since its diff was shown, Genbeya refuses, shows the new diff, and you choose again. The diff is also shown anew when you come back to Genbeya from another app.
- Inline, a click next to the removed lines of a change selects the lines that replace them, which brings the removed ones along.
Show as tree (next to Changes) shows the staged and unstaged files in their folders; Show as list goes back. Genbeya remembers your choice. A folder shows how many changes it holds, and a folder that holds nothing but another folder shares its row, as src/client/app. Its buttons and menu stage, unstage or discard everything in it.
In the tree, ↑ and ↓ move between rows, → opens a folder (again: goes to its first entry), ← closes it (or goes to the folder above), Home and End go to the first and last row, and Enter shows a file’s diff or opens and closes a folder.
Ignoring files
Section titled “Ignoring files”Right-click a file or folder in Changes:
- Ignore file … adds the file, Ignore folder … its folder (or the folder you clicked), and Ignore all *.ext files every file with its extension.
- A dialog asks whether the rule goes into the repository’s
.gitignoreor the one in the file’s folder, and shows the line it adds, such as/src/app/debug.logor*.log. Names that.gitignorewould read as patterns are escaped, and paths start with/, so the rule matches only that file. The file keeps its line endings, and the rule is added once. - Git ignores only files it does not track. For a tracked file the dialog also offers Stop tracking, which keeps the file on disk but deletes it from the repository with the next commit. Stop tracking… in the menu does just that, after asking.
The changed .gitignore then shows up in Changes, ready to commit.
Amending
Section titled “Amending”Tick Amend last commit to change the last commit. Its message is loaded into an empty message box (a message you started stays), and the staged list shows everything the amended commit will hold: the last commit’s changes plus whatever you stage on top.
- Unstage a file, a hunk or lines to leave them out of the commit: they stay in your working tree as unstaged changes.
- Stage more to add it.
- Amend commits exactly what is staged; untick the box to go back to normal. The message box then gets back what it held before, unless you edited the loaded message: your edits stay.
When the last commit is a merge, its changes are shown against its first parent, and the amended commit keeps all its parents. When the commit is already on a remote branch, Genbeya warns you: amending rewrites it, so you would have to force-push (see Force push). There is nothing to amend before the first commit.
Stashes
Section titled “Stashes”Stash changes (the box icon next to Changes) sets your uncommitted changes aside and cleans the working tree. Give the stash a message if you like; choose whether untracked files go along and whether staged changes stay in place.
Stashes are listed below the changes, newest first, with the branch they were made on. Select one to see its files and their diffs, then:
- Pop applies it and removes it from the list.
- Apply applies it and keeps it.
- Branch… creates a branch at the commit the stash was made on, switches to it and pops the stash there — useful when the stash no longer applies cleanly.
- Drop… deletes it. Genbeya asks first.
When a stash conflicts with your changes, the stash stays in the list and the conflicted files appear under Conflicts (see below).
Branches
Section titled “Branches”The branch button at the bottom of the sidebar switches branches; remote branches are checked out as tracking branches. Git refuses a switch that would overwrite local changes — commit, stash or discard them first.
Right-click a commit in History for everything else:
- Create branch here… starts a branch at the commit; tick Switch to the new branch to check it out right away.
- For each branch pointing at the commit: Switch to, Rename…, Set upstream of… (the remote branch pull and push use), Push … to… (see Pushing) and Delete…. A branch with commits that are on neither its upstream nor the current branch is only deleted after a second confirmation, since its commits could be lost.
- For each remote branch: Check out (when there is no local branch of that name) and Delete on the remote…, which removes it for everyone.
Pushing
Section titled “Pushing”The push button in Changes pushes the current branch to its upstream. A branch without upstream offers Publish branch instead: it pushes the branch to origin (or the only remote) under the same name and makes that its upstream, so pull and push know where to go from then on. With several remotes and none called origin, Genbeya asks which one.
Push to… — in the ⋯ menu of Changes, as Push … to… in the menu of a branch in History, and in the palette — pushes any local branch anywhere:
- Remote and Remote branch: by default the upstream, else the same name on
origin. The name can differ, for example yourfeatureto the remote’smain. Genbeya warns when you push to the remote’s default branch or to another branch the remote already has, unless it is the upstream. - Set as upstream makes the remote branch the one pull and push use. It is ticked when the branch has no upstream yet.
- Force (with lease) replaces the remote branch; see below.
Force push
Section titled “Force push”When the remote branch has commits yours lacks — after you amended or rebased commits you had pushed, say — the remote rejects the push. The message offers Force push with lease…, and so does the push dialog.
Before anything happens, Genbeya lists the commits the remote branch loses: everyone who uses the remote loses them too. The push then only goes through while the remote branch is still where your last fetch saw it (--force-with-lease with that commit, plus --force-if-includes on Git 2.30 or newer). If someone pushed in the meantime, it fails with origin/main changed since your last fetch — fetch, look at what they pushed, and decide again. A fetch in between does not change what Genbeya expects; Genbeya never force pushes without a lease.
The remote’s default branch, usually main, is the history everyone starts from: force pushing to it needs a tick in I know, rewrite main anyway.
Resetting
Section titled “Resetting”Right-click a commit in History and choose Reset … to here… to move the current branch to that commit. The dialog explains what each mode keeps:
| Mode | The commits’ changes | Your uncommitted changes |
|---|---|---|
| Soft | staged | kept |
| Mixed (default) | in your files, unstaged | kept |
| Keep | gone | kept; refuses if the reset would overwrite them |
| Hard | gone | gone |
A hard reset lists the uncommitted files it would discard and needs Discard my uncommitted changes ticked; editors with unsaved edits are asked about first. When the commit has files you have but Git does not track on the branch now — say a notes.txt you created after it was deleted, or an ignored .env — hard and keep resets replace them with the commit’s, so the dialog lists them and asks again. If your uncommitted changes change while the dialog is open, Genbeya refuses the reset and you look at it again. When some of the commits are already on the upstream, the dialog says so: afterwards the branch is behind it, a pull brings them back, and removing them there as well takes a force push. Genbeya does not reset during a merge, rebase, cherry-pick or revert.
The message after a reset has Undo, which moves the branch back with the same mode (a hard reset with Keep, which refuses to overwrite anything you changed since). After a hard reset that discarded uncommitted changes, or a reset that replaced files Git did not track, there is no Undo: the commits could come back, the changes could not.
Tags show as yellow chips in History. Right-click a commit and choose Create tag here…; with a message the tag is annotated, without one it is lightweight. The menu also pushes a tag to the remote, deletes it here, or deletes it on the remote. Deleting asks first.
Merging
Section titled “Merging”To merge a branch into the current one, right-click a commit it points to in History and choose Merge … into …, or search the palette (Ctrl+K) for Merge into … and pick the branch. Remote branches and tags merge the same way.
The dialog shows the merge commit’s message, which you can change. When the current branch has no commits of its own, Git just moves it forward and makes no merge commit; tick Always create a merge commit to get one anyway.
Rebasing
Section titled “Rebasing”Rebasing replays the current branch’s own commits on top of another branch, for a straight history instead of a merge commit.
- Rebase … onto … in the menu of a branch, remote branch or tag in History, or Rebase … onto… in the palette. Genbeya says how many commits are replayed before it starts.
- Pull from … by rebasing in the palette fetches the upstream and replays your unpushed commits on top of it, instead of the fast-forward-only Pull.
Rebasing creates new commits. When some of them are already on a remote branch, Genbeya warns you: you would have to force push that branch afterwards.
Uncommitted changes are stashed while a rebase runs and put back afterwards; if they no longer apply cleanly, they stay in the stash list.
Interactive rebase
Section titled “Interactive rebase”Right-click a commit of the current branch and choose Rebase interactively from here… to rewrite the commits after it. The dialog lists them oldest first:
- Drag a commit by its handle to reorder, or use its arrows or
Alt+↑/Alt+↓. - Pick keeps a commit, Reword keeps it with a new message, Drop leaves it out.
- Squash joins a commit to the one above it; the message box shows both messages, and follows reordering until you edit it. Fixup joins it and keeps the message above.
Rebase runs it all; no editor opens. Merge commits can’t be rewritten this way — Genbeya refuses and suggests the terminal. Conflicts stop the rebase as described below.
Cherry-pick and revert
Section titled “Cherry-pick and revert”Right-click a commit in History: Cherry-pick onto … applies its changes as a new commit on the current branch, Revert… undoes them with a new commit. Merge commits are left to the terminal, since Git needs to know which side to follow.
Conflicts
Section titled “Conflicts”When a merge, rebase, cherry-pick or revert conflicts, Git stops halfway. A banner above every view says what is going on — for example Merging feature into main — 2 conflicts — with:
- Resolve, while conflicts are left: goes to Changes, where they are listed.
- Continue, once every conflict is resolved: finishes the merge with its prepared message, or goes on with the next commit of a rebase.
- Skip (rebase, cherry-pick and revert): leaves out the commit Git stopped at, after asking.
- Abort: puts everything back as it was before the operation started. Genbeya asks first; resolutions made so far are lost.
Conflicted files are listed under Conflicts at the top of Changes. Select one to resolve it:
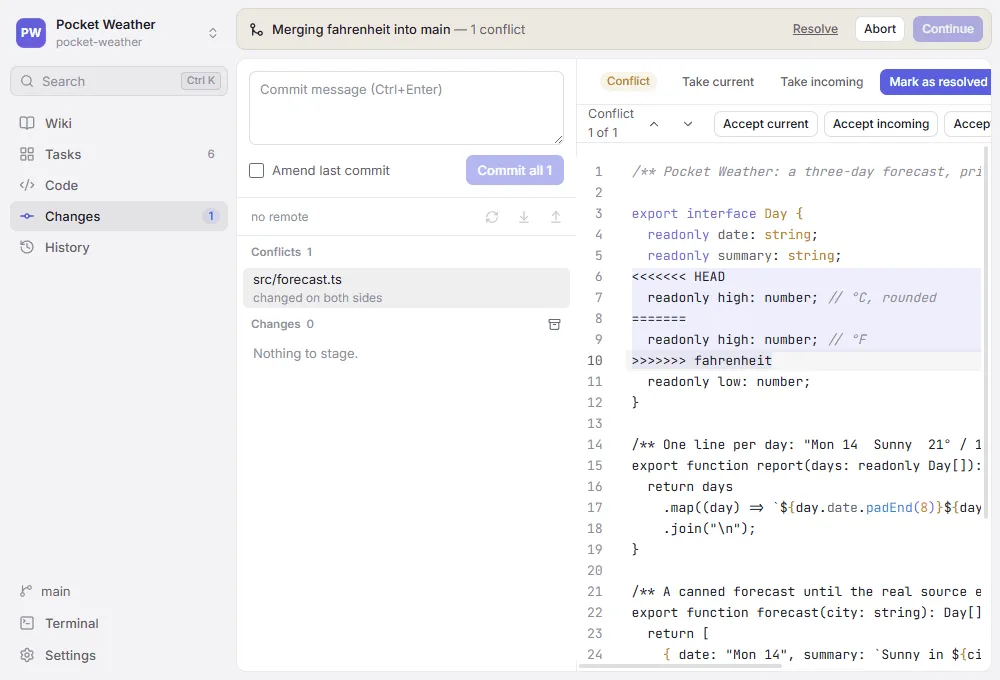
- The editor shows the file with Git’s conflict markers. The bar above it steps through the conflicts; Accept current keeps your side (HEAD), Accept incoming the side being merged in, Accept both keeps both, yours first. Files written in Git’s diff3 style also show the common ancestor, which accepting a side drops.
- Edit the result freely in the editor — the buttons always act on the conflicts still marked in the text.
- Take current and Take incoming in the header use one side for the whole file.
- Mark as resolved saves the result and stages it. With conflict markers left, Genbeya asks first.
Binary files offer only whole sides. A file one side deleted and the other changed offers to keep it or delete it.
History
Section titled “History”History shows every branch with a commit graph. Select a commit to see its message and files; merges are compared with their first parent.